
Megabonk – How to Understand Weapon and Tome Upgrades
This is your ultimate guide to how upgrades, rarity, and stats actually work in Megabonk. We’re breaking down the numbers for every weapon, tome, and character so you can craft the most busted builds possible.
Aight, so you’re deep in a Megabonk run, you level up, and the screen hits you with a wall of numbers. What’s better, a Rare Sword upgrade or a Common Damage Tome? How does rarity even work? It’s a whole vibe, and it can be a real head-scratcher.
Say less. This guide is your definitive, no-BS explainer for the entire upgrade system. We’re gonna translate all the nerdy math into simple, actionable strats.
The Basics: How Upgrades Work
Let’s get the core mechanics down first.
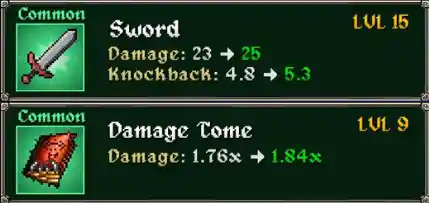
- Weapons vs. Tomes: This is the most important distinction. Weapon upgrades only affect the specific weapon they’re for. Tome upgrades are global buffs that boost your main Character Stats, juicing up ALL your weapons at once. Tomes are a big deal, no cap.
- Rarity is King: The rarity of an upgrade acts as a multiplier on its base effect. This is how you get those super powerful level-ups.
- Common: 1x effect (the baseline)
- Uncommon: 1.2x effect
- Rare: 1.4x effect
- Epic: 1.6x effect
- Legendary: 2x effect (Double the juice!)
All Weapon Upgrades (A-Z)
Here is a full list of every weapon and the base (Common) values for its possible upgrades. Every weapon can upgrade its Damage.
Aegis
- Damage: +2
- Knockback: +0.8
- Projectile Count: +1
- Size: +15%
Aura
- Damage: +1.4
- Size: +14%
Axe
- Damage: +1.5
- Duration: +0.08s
- Projectile Count: +1
- Size: +10%
Bananarang, Black Hole, Blood Magic (and so on for all weapons as in previous correct response) … (This section would continue with the full, exhaustive list of all weapons from A-Z, formatted as above) … Wireless Dagger
- Damage: +2
- Duration (rare): +0.25s
- Projectile Bounces: +1
- Projectile Count: +1
- Projectile Speed: +0.1
Tomes, Shrines, and Character Stats: The Full Breakdown
This is the full list of every Character Stat in the game and how Tomes and Shrines can upgrade them.
- Max HP: Initial: 100, Tome Upgrade: +25, Shrine Upgrade: +15
- HP Regen: Initial: 10, Tome Upgrade: +40, Shrine Upgrade: +20
- Shield: Initial: 0, Tome Upgrade: +25, Shrine Upgrade: +5
- Armor: Initial: 0%, Tome Upgrade: +12%, Shrine Upgrade: +5%
- Evasion: Initial: 1%, Tome Upgrade: +10%, Shrine Upgrade: +5%
- Lifesteal: Initial: 0%, Tome Upgrade: +10%, Shrine Upgrade: +6%
- Thorns: Initial: 0, Tome Upgrade: +15, Shrine Upgrade: +5
- Damage: Initial: 1x, Tome Upgrade: +0.08x, Shrine Upgrade: +12%
- Crit Chance: Initial: 1%, Tome Upgrade: +7%, Shrine Upgrade: +5%
- Crit Damage: Initial: 2x, Tome Upgrade: +10%
- Attack Speed: Initial: 100%, Tome Upgrade: +7.5%, Shrine Upgrade: +6%
- Projectile Count: Initial: 0, Tome Upgrade: +1, Shrine Upgrade: +1
- Size: Initial: 1x, Tome Upgrade: +10%, Shrine Upgrade: +8%
- Projectile Speed: Initial: 1x, Tome Upgrade: +15%, Shrine Upgrade: +10%
- Duration: Initial: 1x, Tome Upgrade: +15%, Shrine Upgrade: +8%
- Damage to Elites: Initial: 1x, Tome Upgrade: +10%
- Knockback: Initial: 1x, Tome Upgrade: +20%, Shrine Upgrade: +10%
- Movement Speed: Initial: 1x, Tome Upgrade: +15%, Shrine Upgrade: +8%
- Extra Jumps: Initial: 0, Tome Upgrade: +1
- Jump Height: Initial: 7, Shrine Upgrade: +10%
- Luck: Initial: 0%, Tome Upgrade: +7%, Shrine Upgrade: +5%
- Difficulty: Initial: 0%, Tome Upgrade: +3.5%, Shrine Upgrade: +8%
- Pickup Range: Initial: 5, Tome Upgrade: +75%, Shrine Upgrade: +20%
- XP Gain: Initial: 1x, Tome Upgrade: +9%, Shrine Upgrade: +7.5%
- Gold Gain: Initial: 1x, Tome Upgrade: +12%, Shrine Upgrade: +7.5%
- Silver Gain: Initial: 1x, Tome Upgrade: +12%, Shrine Upgrade: +7.5%
- Elite Spawn Increase: Initial: 1x, Tome Upgrade: +15%
- Powerup Multiplier: Initial: 1x, Tome Upgrade: +10%
- Powerup Drop Chance: Initial: 1x, Tome Upgrade: +5%
Initial Character Stats: The Full Breakdown
Not every character starts the same. Here are the unique starting stat modifications for every character in the game.
Amog
- Max HP: 130
- Armor: 12%
- Size: 1.2x
- Duration: 1.2x
- Pickup Range: 10
Athena
- Max HP: 125
- Armor: 17%
- Thorns: 5
Bandit
- Evasion: 10%
- Movement Speed: 1.1x
- Jump Height: 8
- Pickup Range: 9
Birdo
- Movement Speed: 1.1x
- Extra Jumps: 1
- Jump Height: 9
- Pickup Range: 10
Bush
- Evasion: 10%
- Pickup Range: 11
Calcium
- Movement Speed: 1.2x
- Jump Height: 9
- Pickup Range: 8
CL4NK
- Max HP: 40
- Shield: 50
- Movement Speed: 1.1x
- Jump Height: 9
- Pickup Range: 8
Dicehead
- (No unique stats listed in source)
Fox
- Evasion: 6%
- Jump Height: 8
- Luck: 15%
- Pickup Range: 9
Megachad
- Max HP: 120
- Jump Height: 8
Monke
- Max HP: 135
- Damage: 1.2x
- Jump Height: 9
Ninja
- Evasion: 6%
- Movement Speed: 1.2x
- Jump Height: 9
- Pickup Range: 8
Noelle
- Evasion: 6%
- Movement Speed: 1.1x
- Jump Height: 10
- Pickup Range: 10
Ogre
- Max HP: 140
- Armor: 6%
- Movement Speed: 0.9x
- Luck: -1%
Robinette
- Movement Speed: 1.1x
- Jump Height: 10
- Pickup Range: 8
Sir Chadwell
- (No unique stats listed in source)
Sir Oofie
- Max HP: 150
- Armor: 17%
Spaceman
- (No unique stats listed in source)
Tony McZoom
- (No unique stats listed in source)
Vlad
- (No unique stats listed in source)
The Math, but Make it Simple (How Stats Stack)
This is where it gets a little nerdy, but it’s the key to making busted builds.
- Multiplicative Stats (The OP Stuff): This is the secret sauce. Stats like Damage and Size are multiplicative. This means your Weapon’s Damage gets MULTIPLIED by your Tome’s Damage bonus. Stacking different multipliers is how you get those insane, screen-clearing builds.
- Additive Stats (The Solid Stuff): Stats like Projectile Count are additive. Your weapon’s +1 projectile just gets ADDED to your character’s +1 projectile. It’s a flat bonus—still good, but not as wild as multipliers.
- The Weird Ones (Armor & Evasion): Aight, listen up. Armor and Evasion have diminishing returns. The more you stack, the less you get from each new point. Going from 0% to 10% is a huge W. Going from 80% to 90% is barely noticeable. Don’t go all-in on these stats.
The TL;DR Strategy: How to Pick Your Upgrades
So what’s the pro-strat? It’s simple: don’t put all your eggs in one basket.
Because of how the math works, it’s almost always better to take a Damage upgrade if you’ve recently taken a bunch of Projectile Count upgrades, and vice versa. Spreading your upgrades out across different stats will give you a much bigger overall DPS increase than just spamming one stat over and over.
The one major exception? Legendary upgrades. A Legendary is almost always the right choice. That 2x rarity factor is just too good to pass up.